Ever opened your WordPress Users screen and wondered, “When did this person last log in?” By default, WordPress doesn’t track or display user login timestamps – a frustrating gap when you’re managing a multi-author blog, membership site, or client project with several admin accounts.
Knowing when each user last logged in helps you spot inactive accounts, identify potential security issues, and keep your team accountable. In this guide, you’ll learn two ways to add a Last Login column to your WordPress Users list: the quick, no-code method using WP Adminify’s Productivity tools, and the developer-friendly approach using custom PHP code.
What Is a Last Login Column in WordPress?
A last login column is an additional column added to the Users > All Users screen in the WordPress admin dashboard that displays the exact date and time each user last authenticated. Once enabled, WordPress records a timestamp every time a user logs in, and that timestamp is displayed directly in the users table – right alongside the Username, Email, Role, and Posts columns.
This gives site administrators instant visibility into user activity without needing to install a full-blown activity logging plugin or dig through server access logs. If you want to go beyond login tracking and monitor all user activity in WordPress, there are options for that too – but a last login column is the simplest starting point.
Why Tracking User Last Login Matters
Adding a last login column isn’t just a nice-to-have – it solves real operational problems:
Security Monitoring
Stale user accounts are a security liability. If an editor hasn’t logged in for six months, their account could be compromised without anyone noticing. By tracking last login timestamps, you can quickly identify dormant accounts and take action – whether that means reaching out to the user, resetting their password, or downgrading their role. Pairing this with two-factor authentication adds another layer of protection for accounts that are still active.
WordPress security best practices recommend regular audits of user accounts. The WordPress Codex on Roles and Capabilities emphasizes the principle of least privilege, and knowing when users last logged in is the first step in enforcing it.
Team Accountability
For agencies managing content teams or multi-author publications, knowing who’s actively logging in tells you who’s engaged and who might need a nudge. If a contributor was assigned articles but hasn’t logged in for weeks, that’s a workflow flag you want to catch early.
Membership and Client Sites
On membership sites powered by WooCommerce Memberships, MemberPress, or similar plugins, tracking last login helps you understand engagement. For client sites – especially if you’ve built a custom client dashboard – it helps justify ongoing maintenance by demonstrating that the admin tools you’ve set up are actually being used.
Compliance and Audit Trails
Some industries require access logging for compliance (HIPAA, GDPR data access records, SOC 2). While a last login column alone isn’t a full audit trail, it provides a quick reference point that complements more detailed solutions like the Activity Logs addon – which records every user action, not just logins.
Method 1: Add Last Login Column Using WP Adminify (No Code)
The fastest way to add a last login column is with WP Adminify, which includes this feature as part of its Custom Admin Columns module – no code, no additional plugins.
Step 1: Install and Activate WP Adminify
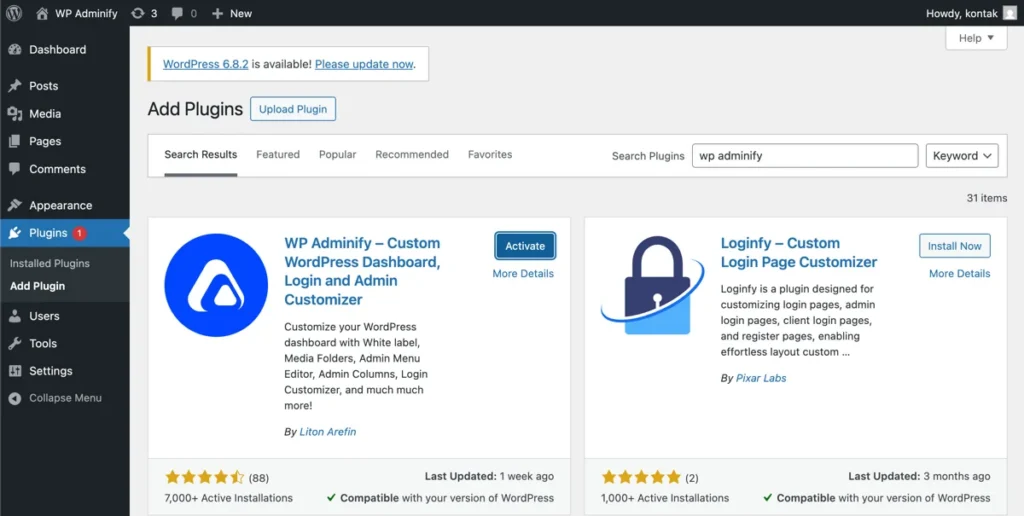
If you haven’t already installed WP Adminify, head to Plugins > Add New in your WordPress dashboard, search for “WP Adminify,” and click Install Now followed by Activate. The plugin is free on WordPress.org with 7,000+ active installations.
Step 2: Navigate to Custom Admin Columns
Go to WP Adminify > Settings and click the Productivity tab. Scroll down until you find the Custom Admin Columns section.
Make sure the Custom Admin Columns toggle is set to SHOW (green). This reveals all the available column options.
Step 3: Enable the Last Login Column
Under the Custom Admin Columns options, you’ll see several checkboxes:
- Show Post Thumbnails Column
- Show Post/Page ID Column
- Show “Comment ID” Column for Comment
- Show “Last Login” Column for Users
- Show “Taxonomy ID” Column
- Show “URL Path” Column for Post Types
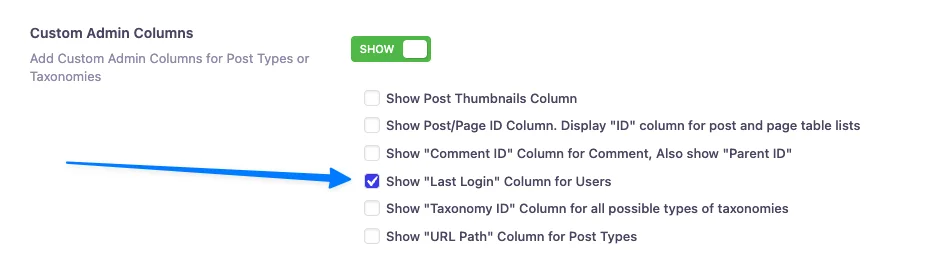
Check the box next to Show “Last Login” Column for Users and click Save Settings.
That’s it – no page refresh gymnastics, no configuration screens. One checkbox, one save.
Step 4: Verify the Last Login Column
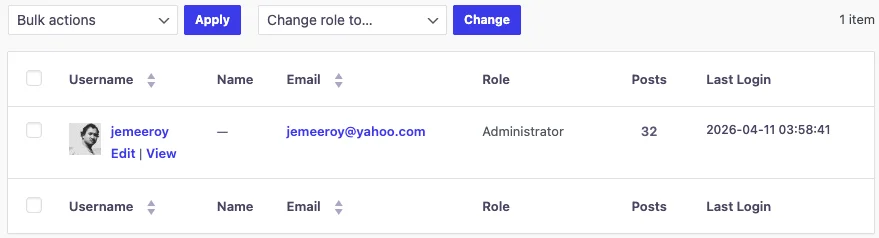
Navigate to Users > All Users in your WordPress dashboard. You’ll now see a new Last Login column on the far right of the users table.
The column displays the full date and time in YYYY-MM-DD HH:MM:SS format, so you know exactly when each user last authenticated. The timestamp updates automatically every time a user logs in – no manual action required.
Note: The last login timestamp is recorded from the moment the feature is enabled. Users who logged in before you activated this option will show an empty value until their next login.
Bonus: Other Useful Admin Columns
While you’re in the Custom Admin Columns settings, consider enabling these other productivity boosters:
- Post Thumbnails Column – See featured images at a glance in your Posts/Pages list
- Post/Page ID Column – Instantly grab post IDs without hovering or inspecting elements (handy for shortcodes and custom queries)
- URL Path Column – View the slug/permalink directly in the post list
These columns are part of WP Adminify’s Productivity features, all designed to reduce clicks and speed up your admin workflow. For a deeper look at which columns actually save time, check out our guide on essential admin columns for WordPress. And if you need even more control – like adding ACF fields as admin columns – the Admin Columns Editor addon has you covered.
Method 2: Add Last Login Column Using Custom Code
If you prefer a code-based approach – perhaps you’re building a custom theme, want to avoid plugin dependencies, or just enjoy writing PHP – here’s how to add a last login column with a few functions in your theme’s functions.php file or a custom plugin.
Step 1: Record the Login Timestamp
First, hook into WordPress’s wp_login action to save a timestamp as user meta every time someone logs in:
This stores the login time in the _last_login user meta field using WordPress’s current_time( 'mysql' ) function, which respects your site’s timezone settings configured under Settings > General.
Step 2: Add the Column Header to the Users Table
Next, register a new column in the Users list table:
/** * Add “Last Login” column to the Users list table. * * @param array $columns Existing columns. * @return array Modified columns. */ function wpat_add_last_login_column( $columns ) { $columns[‘last_login’] = __( ‘Last Login’, ‘your-textdomain’ ); return $columns; } add_filter( ‘manage_users_columns’, ‘wpat_add_last_login_column’ );Step 3: Display the Login Timestamp in the Column
Now populate the column with the stored timestamp:
/** * Display the last login timestamp for each user. * * @param string $output Custom column output. * @param string $column_name Column identifier. * @param int $user_id User ID. * @return string Column content. */ function wpat_show_last_login_column( $output, $column_name, $user_id ) { if ( ‘last_login’ === $column_name ) { $last_login = get_user_meta( $user_id, ‘_last_login’, true ); if ( ! empty( $last_login ) ) { $output = esc_html( $last_login ); } else { $output = __( ‘Never’, ‘your-textdomain’ ); } } return $output; } add_filter( ‘manage_users_custom_column’, ‘wpat_show_last_login_column’, 10, 3 );Step 4: Make the Column Sortable (Optional)
To allow sorting users by their last login date, add this:
/** * Make the Last Login column sortable. * * @param array $columns Sortable columns. * @return array Modified sortable columns. */ function wpat_last_login_sortable( $columns ) { $columns[‘last_login’] = ‘last_login’; return $columns; } add_filter( ‘manage_users_sortable_columns’, ‘wpat_last_login_sortable’ );/** * Handle the sorting query for last login. * * @param WP_User_Query $query The user query. */ function wpat_last_login_sort_query( $query ) { if ( ‘last_login’ === $query->get( ‘orderby’ ) ) { $query->set( ‘meta_key’, ‘_last_login’ ); $query->set( ‘orderby’, ‘meta_value’ ); } } add_action( ‘pre_get_users’, ‘wpat_last_login_sort_query’ );Complete Code (All-in-One Snippet)
Here’s the full solution you can drop into your functions.php or a custom plugin file:
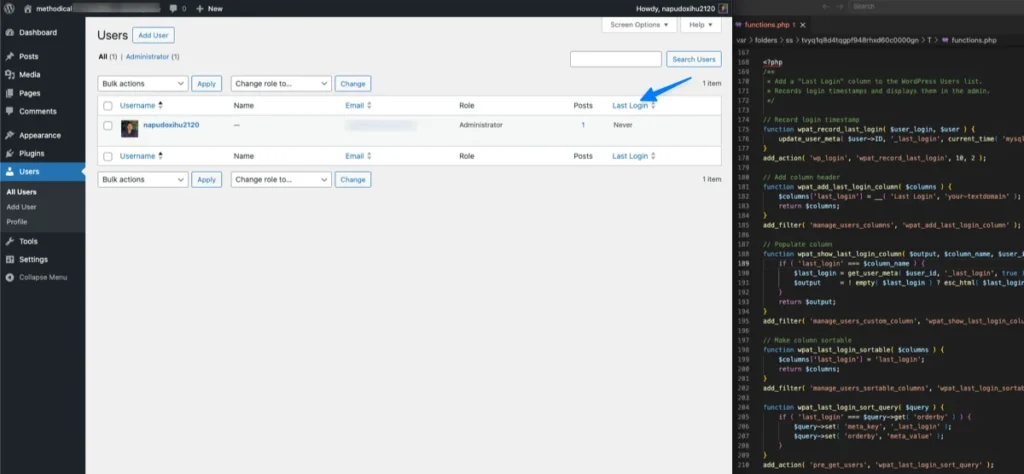
Important considerations with the code approach:
- Theme updates will erase your code if you add it to a parent theme’s
functions.php. Use a child theme or a site-specific plugin instead. - No UI to toggle it on/off – once the code is active, the column is always visible. With WP Adminify, you can disable it with a single checkbox.
- No retroactive data – just like the WP Adminify method, timestamps are only recorded from the moment the code is active.
WP Adminify vs Custom Code: Which Should You Choose?
| Criteria | WP Adminify | Custom Code |
|---|---|---|
| Setup time | ~30 seconds | 10-15 minutes |
| Code required | None | PHP (functions.php or plugin) |
| Toggle on/off | One checkbox | Remove/comment out code |
| Sortable column | Built-in | Requires extra code |
| Theme update safe | Yes (plugin-based) | No (unless child theme/plugin) |
| Additional features | 60+ admin tools included | Only what you code |
| Best for | Site managers, agencies, non-developers | Developers who avoid plugins |
For most WordPress users, WP Adminify is the practical choice – you get the last login column plus 60+ admin features that replace multiple plugins without writing a single line of code. Developers who want full control or are already running a lean custom setup may prefer the code approach.
Questions for Adding Last Login column
Conclusion
Adding a last login column to your WordPress Users list is a small change that delivers real value for security monitoring, team management, and site administration.
Here’s a quick recap:
- WP Adminify method: Navigate to WP Adminify > Settings > Productivity > Custom Admin Columns, check “Show Last Login Column for Users,” and save. Done in 30 seconds.
- Custom code method: Add four functions to your
functions.phpor a custom plugin to record timestamps, register the column, display data, and enable sorting. - Both methods only track logins from the moment they’re activated – no retroactive data.
If you’re already using WP Adminify for dashboard customization, admin menu editing, or white labeling, the last login column is just one more checkbox in your existing setup. If you’re not using it yet, give WP Adminify a try – it’s free and takes under a minute to set up.