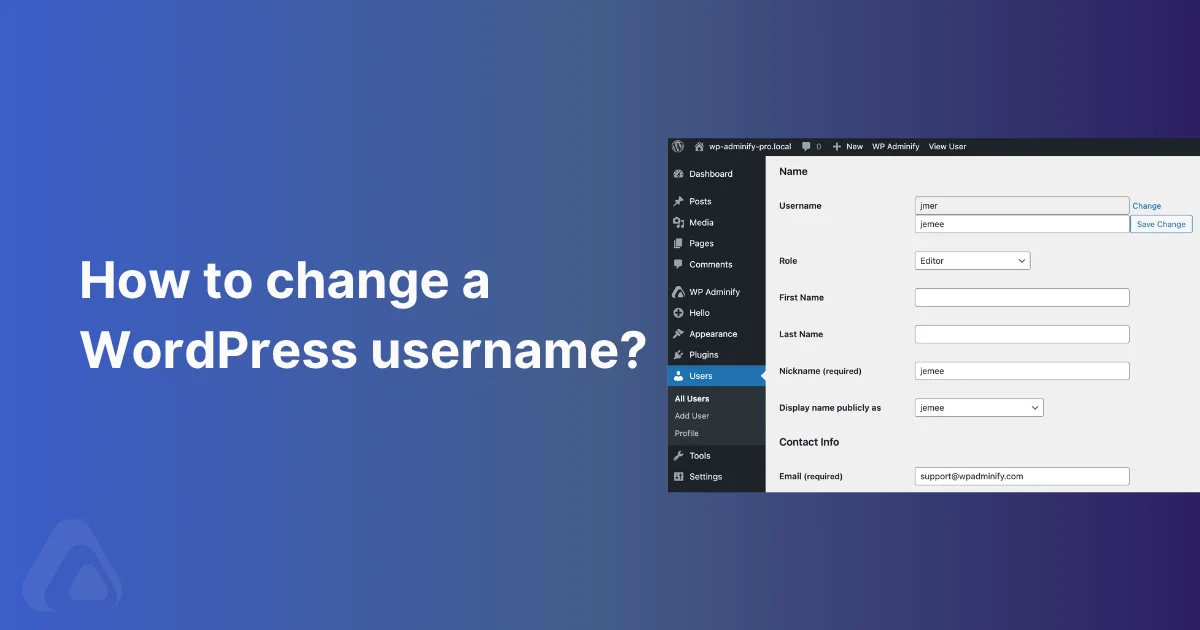
You created a WordPress account two years ago and called yourself “admin123”. Now your client logs into the dashboard and sees that name on every comment, author byline, and password-reset email. You head to Users → Profile to fix it, and the Username field is grayed out with a tooltip that says “Usernames cannot be changed.”
That is core WordPress behavior. The user_login column in the wp_users table is locked from the admin UI on purpose. There are five ways around it that actually work without breaking the site, and this guide walks through each one. The new WP Adminify Username Change module, a code snippet for functions.php, the phpMyAdmin route that works on any host, WP-CLI for people who live in the terminal, and the native WordPress create-and-delete dance for the cases where everything else is unavailable.
What are the WordPress username requirements?
A WordPress username can be up to 60 characters and may contain letters, numbers, spaces, and the characters _ . - @. It has to be unique on the site and cannot be empty once WordPress has sanitized it. Core sets no minimum length, and once the account exists you cannot edit the name from the dashboard.
| Rule | What WordPress actually enforces |
|---|---|
| Allowed characters | Letters, numbers, spaces, and _ . - @. Everything else is removed by sanitize_user() in strict mode |
| Maximum length | 60 characters, because wp_users.user_login is a VARCHAR(60) column |
| Minimum length | None in core. The name only has to survive sanitizing without becoming empty |
| Uniqueness | One login per site, or per network on Multisite. username_exists() blocks duplicates |
| Letter case | Stored exactly as typed, but matched case-insensitively at login because of the column collation |
| Banned names | Whatever the illegal_user_logins filter returns, plus the Banned Names list under Network Settings on Multisite |
| Editable later | No. The field is read-only in Users > Profile, which is why the five methods below exist |
Two code paths apply those rules differently, and the difference is what people hit when a name will not save. The registration form runs validate_username(), which compares your input against the sanitized version and rejects the whole thing when they differ, so you get a visible error. A programmatic wp_insert_user() call runs sanitize_user() and carries on, so the account is created under a quietly shortened login. If a new user’s name does not match what you typed, an unsupported character is the first thing to check.
None of this governs the name visitors actually see. WordPress keeps the login in user_login, the author-archive slug in user_nicename, and the byline in display_name, and only the first one is locked. Changing a display name takes five seconds in Users > Profile. Worth knowing before you treat a login as secret: the WordPress REST API publishes usernames on a default install, so an unguessable login protects far less than a strong password and two-factor do.
Why WordPress Locks the Username Field
The user_login field is the primary identifier WordPress uses for login authentication. It also seeds entries in wp_usermeta, comment author records, post-author relationships, and any third party plugin that stores user references by login string instead of user ID.
If WordPress let anyone change a username from the profile screen, sites running a poorly coded plugin would silently break. Comments orphaned. ACF user-relationship fields lost. REST API tokens invalidated. Core takes the safe path and locks the field instead. The official Users Screen docs say “Username (cannot be changed)” right there.
The methods below all work because they update the same database column directly. They just wrap the change in safeguards: capability checks, username sanitization, session invalidation. That way you don’t end up with broken auth and a panicked client.
[This feature is coming soon in WP Adminify. We took screenshot from our beta version. It will be available in WP Adminify within 1 or 2 upcoming release.]
Method 1: WP Adminify Username Change (recommended for most sites)
The fastest GUI route. WP Adminify v3.7+ ships a Username Change module under WP Adminify → Security → Users Security. Once it’s on, every user edit screen gets a “Change” link beside the username field. Exactly where WordPress should have put it in 2010.
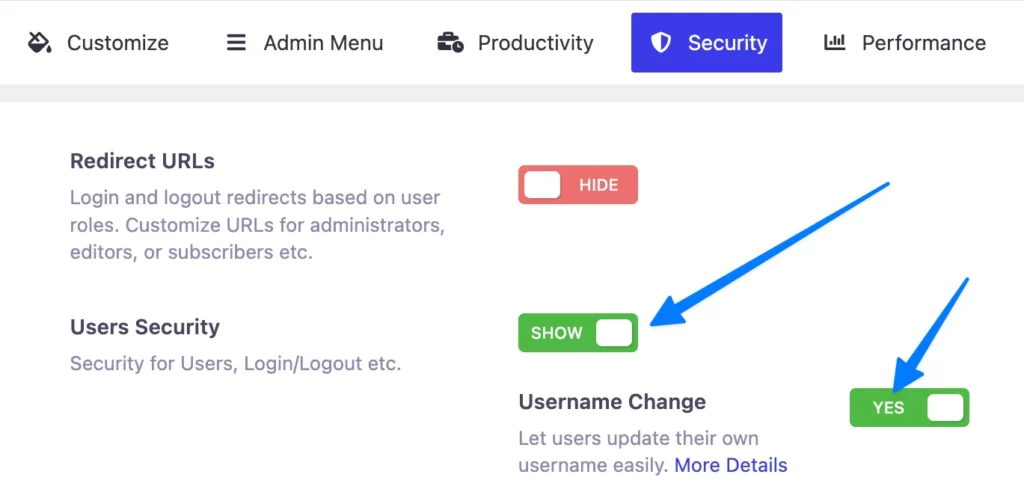
Step 1 – Enable the Username Change toggle
In your WordPress admin, go to WP Adminify → Security. Scroll to the Users Security row, switch it to Show, then toggle Username Change to Yes. The setting saves automatically.
Step 2 – Open the user you want to rename
Go to Users → All Users. Click Edit under the user whose username you want to change. Scroll down to the Name section.
Step 3 – Click “Change” beside the username
You will now see a Change link beside the previously-locked Username field. Click it.
![User edit screen showing the Change link beside the username and the new input field with Save Change button]](https://d1k2c27psfzbiv.cloudfront.net/wp-content/uploads/2026/05/03072846/User-edit-screen-showing-the-Change-link-1024x463.webp)
Step 4 – Type the new username and save
A new text input appears below the original username, plus a blue Save Change button. Type your desired username. WP Adminify validates it on save. It checks against existing usernames, runs WordPress’s sanitize_user() rules (no spaces, restricted character set), and rejects anything that would conflict.
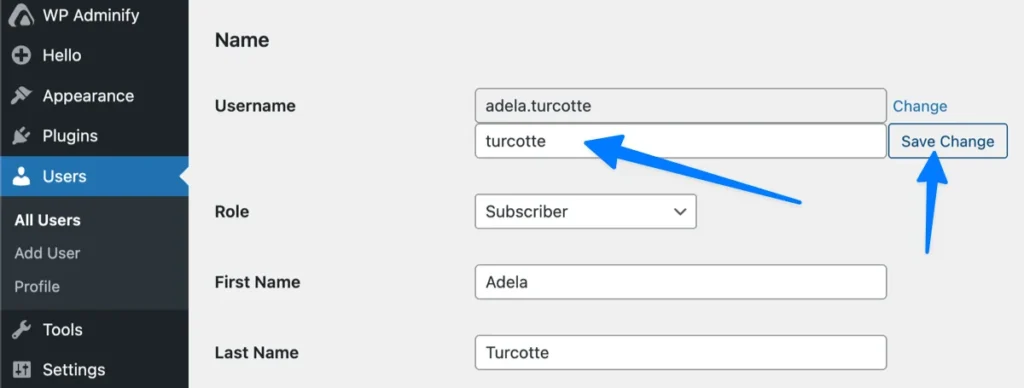
Click Save Change. The username updates instantly. If you changed your own username, WordPress logs you out and you’ll need to log back in with the new username and your existing password (more on this in the “What happens right after” section).
Why this is the path I recommend first: WP Adminify handles the capability check (edit_users required), runs the change through wp_update_user() hooks so other plugins fire correctly, and updates session tokens so the affected user is properly logged out. You get the database accuracy of a manual SQL update without the orphan-data risk that comes from forgetting one of those steps.
Method 2: Add code to functions.php (developer-friendly, no plugin)
If you don’t want to install a plugin just for one username change, drop this snippet into your active theme’s functions.php. Or better, use a code snippets manager so it survives a theme switch and you can disable it with a toggle when you’re done.
The snippet adds an admin-only handler that updates the user_login column directly when an authorized request hits it.
How to use it:
- Add the snippet to
functions.phpin your active theme, or use the code snippets manager in WP Adminify. - While logged in as an administrator, visit:
https://yoursite.com/wp-admin/?adminify_change_username=1&user_id=2&new_username=newname - Replace
2with the actual user ID andnewnamewith the username you want. - Remove the snippet right after the change. A username-change handler accessible via URL is a security risk, even with the capability check. Don’t leave it in.
What this code does, line by line:
current_user_can( 'edit_users' )blocks anyone who isn’t an admin.sanitize_user()with the strict flag strips invalid characters that would break login.username_exists()stops a duplicate-username collision that would corrupt the users table.$wpdb->update()on$wpdb->usersruns a direct UPDATE on theuser_logincolumn with prepared placeholders.WP_Session_Tokens::destroy_all()invalidates the affected user’s sessions so they have to re-authenticate.
This is functionally what WP Adminify does behind the GUI button. Minus the validation UI, the audit log entry, and the protection against accidentally renaming the only admin out of dashboard access.
Method 3: Edit wp_users directly in phpMyAdmin
The database-level fallback. Works on any host with phpMyAdmin (cPanel, Plesk, most managed hosts). Use this when you can’t log into WordPress at all. For example, if a previous admin locked you out of the dashboard or your only admin account is the one you’re trying to rename and the GUI methods can’t help.
Step 1 – Open phpMyAdmin and select the WordPress database
From your hosting control panel, open phpMyAdmin and click your WordPress database in the left sidebar. If you have multiple databases, the right one is referenced as DB_NAME in your wp-config.php file.
Step 2 – Open the wp_users table
Find the wp_users table. Your prefix may differ – check $table_prefix in wp-config.php. Click it to see the user list.
Step 3 – Edit the row
Click Edit beside the user you want to rename. Find the user_login field. Change it to your new username. Click Go at the bottom to save.
![phpMyAdmin showing the wp_users row with user_login field highlighted for edit]](https://d1k2c27psfzbiv.cloudfront.net/wp-content/uploads/2026/05/03074038/phpMyAdmin-showing-the-wp_users-row-with-user_login-field-highlighted-for-edit-1024x660.webp)
One thing not to touch: user_nicename. That is the URL-friendly version of the display name and WordPress regenerates it from the new username automatically when the user updates their profile next. Editing it manually here can desync the author archive slug.
SQL alternative for the terminal-friendly
If you have command-line MySQL access:
UPDATE wp_users SET user_login = ‘newname’ WHERE ID = 2;One line. Done. Replace wp_ with your actual table prefix, newname with the new username, and 2 with the user ID.
Method 4: WP-CLI command (one-liner)
If your host supports WP-CLI (most managed hosts do – Kinsta, WP Engine, Cloudways, SiteGround all bundle it), this is the quickest method.
wp db query “UPDATE $(wp db prefix)users SET user_login=’newname’ WHERE ID=2;”Or, if you prefer the safer wrapper that also runs WordPress hooks:
wp user update 2 –user_login=newnameOne thing to watch: wp user update doesn’t always allow user_login changes on every WP-CLI version. If it errors, fall back to the raw SQL form above. Either way, follow up with:
That invalidates the renamed user’s existing sessions so they have to log in again with the new username.
Method 5: Create a new user and delete the old one (native WP, zero code)
This is the route the WordPress.org documentation suggests because it doesn’t touch the database directly. It is safe but slow, and it changes the user ID, which causes problems on sites where content is referenced by user ID.
Step 1 – Create the new user
Go to Users → Add New. Enter the new username, the same email as the old account (you’ll need to temporarily change the old account’s email to a placeholder first, since WordPress requires unique emails). Set the role to match the old user.
Step 2 – Log out of the old account
You can’t delete the user you’re currently logged in as. Log out and log back in as another administrator.
Step 3 – Delete the old user and reassign content
Go to Users → All Users. Hover over the old username and click Delete. WordPress will ask what to do with the user’s content. Choose Attribute all content to and pick your new username from the dropdown.
Trade-offs to know about:
- You lose the original user ID. Any plugin that stores data against user ID (like ACF user fields, Easy Digital Downloads order history, BuddyBoss profiles) needs to be migrated manually.
- Comment authorship transfers, but custom meta tied to the old ID does not.
- Email notification subscriptions usually need to be re-confirmed.
I’d only use this on a small site with no third party plugins that lean on user ID. For everything else, the first four methods are safer.
Comparison table: pick the right method
| Method | Difficulty | Risk | Best for | Preserves user ID? |
|---|---|---|---|---|
| 1. WP Adminify Username Change | Easy (GUI) | Low | Most sites – agencies, non-developers, multisite | Yes |
| 2. functions.php code snippet | Medium | Medium (URL-triggered, must be removed after) | Developers, one-off changes, no plugin install | Yes |
| 3. phpMyAdmin SQL edit | Medium | Medium (one typo can corrupt the row) | Locked out of admin, hosting-only access | Yes |
| 4. WP-CLI command | Easy (if CLI available) | Low | Managed hosts, server-savvy admins | Yes |
| 5. Create + delete (native WP) | Easy | High (loses user ID, breaks plugin meta) | Small sites, no third party user-meta dependencies | No |
What happens right after you change a username
Most guides skip this part. Three things happen the moment user_login updates:
- If you changed your own username, you get logged out immediately. WordPress invalidates your session because the cookie is keyed against the old
user_login. Log back in with the new username and your existing password. The password doesn’t change. - If you changed someone else’s username, they get logged out the next time their cookie is validated. They’ll see the login screen and need to use the new username.
- The author archive URL changes. If your author URL was
yoursite.com/author/oldname/, it now becomesyoursite.com/author/newname/. The old URL returns 404. Set up a 301 redirect from the old slug to the new one if the page had backlinks or organic traffic.
What does not change:
- The user ID stays the same (methods 1 through 4).
- The display name (the public byline) stays the same unless you also update it.
- The email address stays the same.
- The password stays the same.
- All user roles, capabilities, and meta stay the same.
- Authored posts, comments, and media uploads stay attached to the same user.
Common issues and fixes
“Username already exists” error
WordPress requires unique usernames. Pick a different one or, if the duplicate is an old test account you don’t need, delete that account first.
The change saved but I’m still seeing the old username on posts
The byline shown publicly is display_name, not user_login. Go to Users → Profile and update Display name publicly as to match your new preference.
I’m locked out after changing my own username
Use the new username with your existing password. If that fails, request a password reset. The reset link is sent to your email address, which didn’t change. If you’ve also lost email access, follow the password reset guide via phpMyAdmin.
Author archive URL returns 404
The slug changed with the username. Either set up a 301 redirect (use your SEO plugin or the URL redirection feature), or manually update user_nicename in wp_users back to the old slug if SEO is the priority.
WooCommerce orders show “Guest” instead of the renamed customer
WooCommerce stores the customer reference by user ID, not username. So this shouldn’t happen with methods 1 through 4. If you used method 5 (create + delete), the user ID changed and you’ll need to manually reassign the orders to the new account from WooCommerce → Orders.
Multisite: which database table do I edit?
On Multisite, users are global. They live in the network-level wp_users table, not the per-subsite wp_2_users table. Edit the network table. The username change applies across every subsite the user has access to.
Can wp_update_user() change user_login?
No. wp_update_user() will happily update the email, display name, role, password and the rest, but it does not change user_login. Pass a new login in the array and the call still succeeds, which is what makes this so confusing: nothing errors, and the username is simply unchanged. WordPress treats the login as a fixed identifier once the account exists.
So if you are scripting this, do not reach for wp_update_user(). Use one of the methods above instead: WP-CLI for a single command, a direct wp_users update when you are already in the database, or create a replacement user and reassign their content.
Two fields nearby often get mistaken for the login and are updatable. user_nicename is the URL-safe slug used in author archive links, and display_name is the name shown publicly on posts. Changing either leaves the actual login untouched, which is usually all you need when the goal is to stop a real name appearing on the front end.
WordPress Username FAQs
Conclusion
Five methods, one job. Pick by use case:
- Most sites: WP Adminify Username Change. GUI, safe, audit-logged.
- One-off, no plugin: the functions.php snippet. Just remove it after the change.
- Locked out of admin: phpMyAdmin SQL edit.
- Server access available: WP-CLI one-liner.
- Tiny site, no third party user data: create new user + delete old. Last resort.
Whichever method you pick, remember the post-change behavior. Changing your own username logs you out, the password stays the same, and the author archive URL updates. If you want the safest path plus 60+ other admin tools in the same plugin, turn on the Security module in WP Adminify.